> ## Documentation Index
> Fetch the complete documentation index at: https://docs.shipthing.com/llms.txt
> Use this file to discover all available pages before exploring further.
# Overview
> Learn how to use payments in your application.
ShipThing comes with a generic payments module that enables you to charge your users
## Providers
In the `@repo/payments` package in your repository you can find the `providers` folder.
There are multiple providers available:
## Local development
The way to test the webhook during local development
This way is universal to all providers. Stripe provides its own CLI to better handle local development. We will introduce it in detail in the Stripe chapter.
### Tunnel
If you want to test the webhook locally, you can use [`ngrok`](https://ngrok.com/) to create a tunnel to your local machine. Ngrok will then give you a URL that you can use to test the webhook locally.
To do so, install ngrok and run it with the following command (while your ShipThing web development server is running):
```bash theme={"system"}
ngrok http 3002
```
We forward webhooks to port 3002 of `apps/api` by default. If your web development server is not port 3002, please modify the port in the ngrok command.
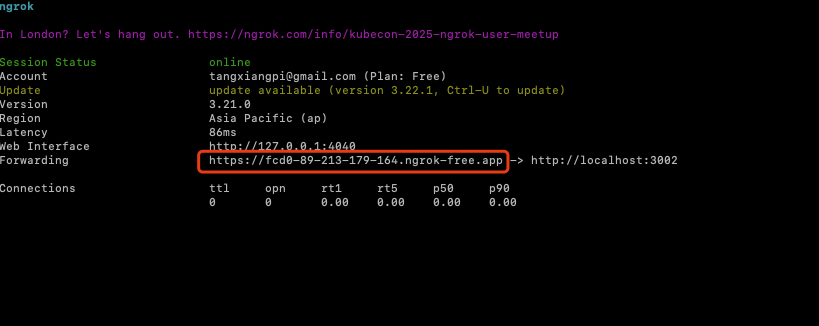 This will give you a URL (see the Forwarding output) that you can use to create a webhook in Stripe. Just use that url and add `/api/webhooks/{providerName}` to it. Replace `{providerName}` with the name of the provider you are using. For example, if you are using Stripe, you would use `stripe` as the provider name.
## Production development
When going to production, you will need to set the webhook URL and the events you want to listen to in payment provider.
If the webhook path is `/api/webhooks/stripe` and your app is hosted at `https://myapp.com` then you need to enter `https://myapp.com/api/webhooks/stripe` as the URL.
This will give you a URL (see the Forwarding output) that you can use to create a webhook in Stripe. Just use that url and add `/api/webhooks/{providerName}` to it. Replace `{providerName}` with the name of the provider you are using. For example, if you are using Stripe, you would use `stripe` as the provider name.
## Production development
When going to production, you will need to set the webhook URL and the events you want to listen to in payment provider.
If the webhook path is `/api/webhooks/stripe` and your app is hosted at `https://myapp.com` then you need to enter `https://myapp.com/api/webhooks/stripe` as the URL.